Execute Demo
After compiling the demo, you can start the components either manually or automatically using our provided script.
Start the Demo Automatically
You can launch the entire demo with a single command:
cd srsRAN_test_environment/scripts
./run_all.sh
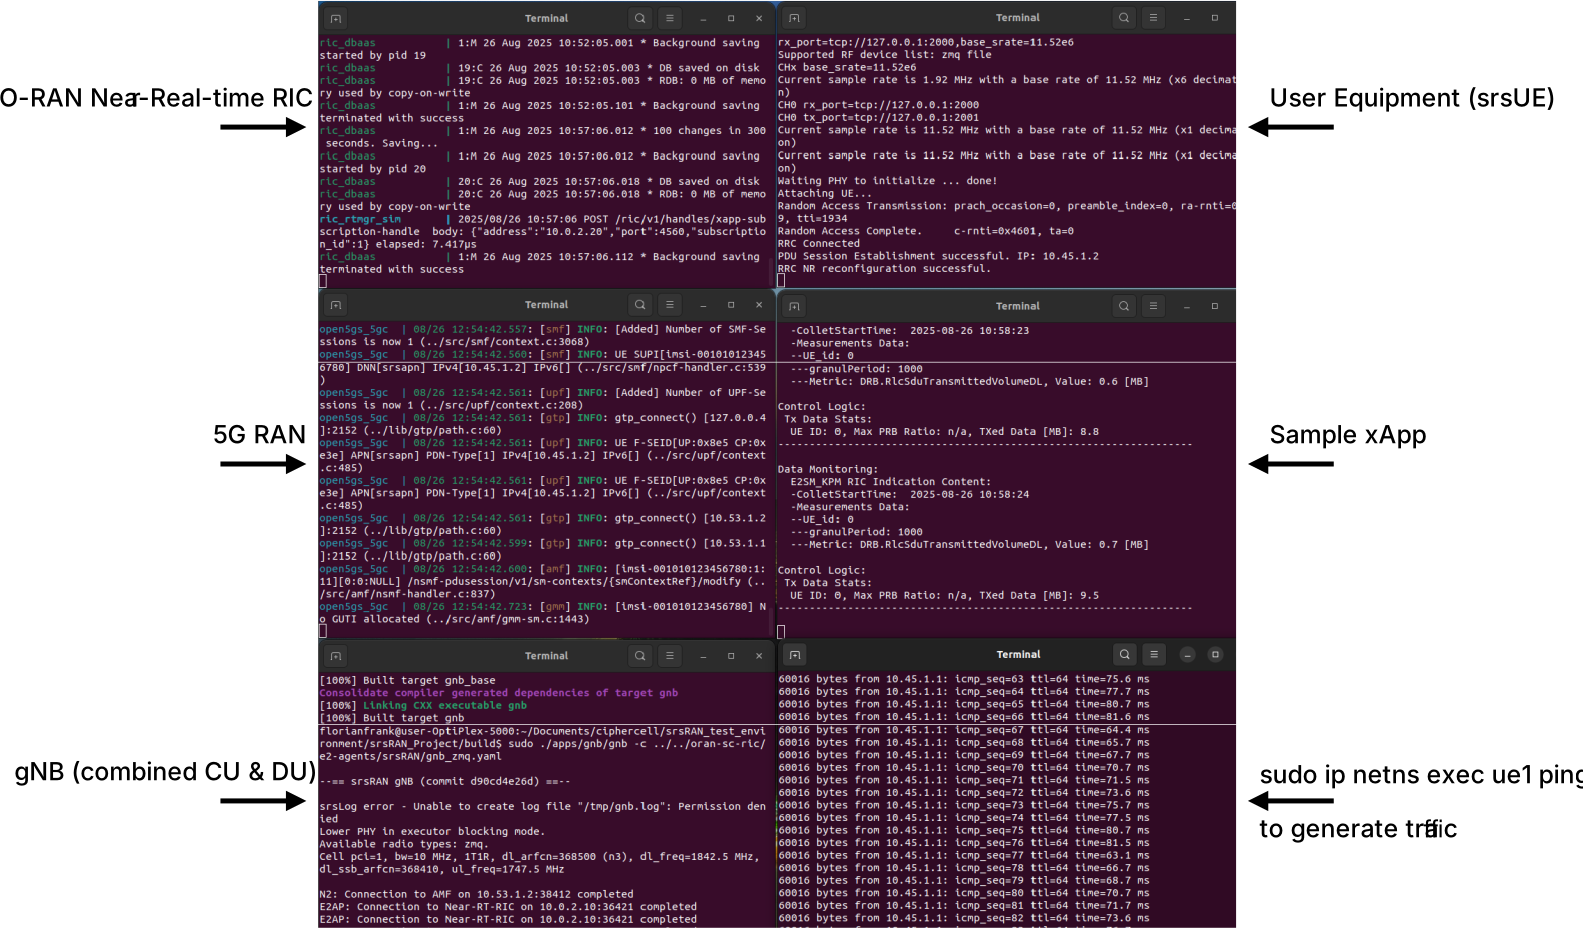
This script sets up a tmux environment with five terminals, each starting one of the core services:
- Near-Real-Time RIC
- 5G Core Network
- gNB
- User Equipment (UE)
- Sample xApp
Next, we explain how to start the services manually.
Manually Start the Demo
When starting the demo manually, you need six separate terminal windows, as shown in the figure below.
1. O-RAN Near-Real-Time RIC
Start the prebuilt Docker Compose setup:
cd srsRAN_test_environment/oran-sc-ric
docker compose up
The RIC is automatically started when ric_submgr | RMR is ready now ... is displayed.
2. 5G Core Network
Start the 5G core network using:
cd srsRAN_test_environment/srsRAN_Project/docker
docker compose up --build 5gc
The output should look similar to the following:
open5gs_5gc  | 08/26 14:21:47.819: [app] INFO: Configuration: 'open5gs-5gc.yml' (../lib/app/ogs-init.c:130)
open5gs_5gc  | 08/26 14:21:47.821: [dbi] INFO: MongoDB URI: 'mongodb://127.0.0.1/open5gs' (../lib/dbi/ogs-mongoc.c:130)
open5gs_5gc  | 08/26 14:21:47.821: [sbi] INFO: NF Service [nudr-dr] (../lib/sbi/context.c:1812)
open5gs_5gc  | 08/26 14:21:47.821: [sbi] INFO: nghttp2_server() [http://127.0.0.20]:7777 (../lib/sbi/nghttp2-server.c:414)
open5gs_5gc  | 08/26 14:21:47.822: [app] INFO: UDR initialize...done (../src/udr/app.c:31)
open5gs_5gc  | 08/26 14:21:47.822: [nrf] INFO: [3c9e41fc-8277-41f0-84fb-2fbb3df1b2cd] NF registered [Heartbeat:10s] (../src/nrf/nf-sm.c:190)
open5gs_5gc  | 08/26 14:21:47.822: [sbi] INFO: (NRF-notify) NF registered [3c9e41fc-8277-41f0-84fb-2fbb3df1b2cd:1] (../lib/sbi/nnrf-handler.c:924)
open5gs_5gc  | 08/26 14:21:47.822: [sbi] INFO: [UDR] (NRF-notify) NF Profile updated [3c9e41fc-8277-41f0-84fb-2fbb3df1b2cd:1] (../lib/sbi/nnrf-handler.c:938)
open5gs_5gc  | 08/26 14:21:47.823: [sbi] INFO: (NRF-notify) NF registered [3c9e41fc-8277-41f0-84fb-2fbb3df1b2cd:1] (../lib/sbi/nnrf-handler.c:924)
open5gs_5gc  | 08/26 14:21:47.823: [sbi] INFO: [UDR] (NRF-notify) NF Profile updated [3c9e41fc-8277-41f0-84fb-2fbb3df1b2cd:1] (../lib/sbi/nnrf-handler.c:938)
open5gs_5gc  | 08/26 14:21:47.823: [sbi] INFO: [3c9e41fc-8277-41f0-84fb-2fbb3df1b2cd] NF registered [Heartbeat:10s] (../lib/sbi/nf-sm.c:221)
open5gs_5gc  | 08/26 14:21:47.823: [sbi] INFO: (NRF-notify) NF registered [3c9e41fc-8277-41f0-84fb-2fbb3df1b2cd:1] (../lib/sbi/nnrf-handler.c:924)
open5gs_5gc  | 08/26 14:21:47.823: [sbi] INFO: [UDR] (NRF-notify) NF Profile updated [3c9e41fc-8277-41f0-84fb-2fbb3df1b2cd:1] (../lib/sbi/nnrf-handler.c:938)
open5gs_5gc  | 08/26 14:21:47.823: [nrf] INFO: [3c9ea1f6-8277-41f0-b327-a1a9bf3b355a] Subscription created until 2025-08-27T14:21:47.823366+02:00 [validity_duration:86400] (../src/nrf/nnrf-handler.c:445)
open5gs_5gc  | 08/26 14:21:47.823: [sbi] INFO: [3c9ea1f6-8277-41f0-b327-a1a9bf3b355a] Subscription created until 2025-08-27T14:21:47.823366+02:00 [duration:86400,validity:86399.999870,patch:43199.999935] (../lib/sbi/nnrf-handler.c:708)
3. Start the gNB
Run the gNB application:
cd srsRAN_test_environment/srsRAN_Project/build/apps/gnb
sudo ./gnb -c srsRAN_test_environment/oran-sc-ric/e2-agents/srsRAN/gnb_zmq.yaml
⚠️ Warning: Make sure the gNB application was built with ZMQ support (see previous installation page).
You should see a successful connection to the Near-RT RIC and the 5G Core network via its AMF. The output should look similar to:
--== srsRAN gNB (commit d90cd4e26d) ==--

Lower PHY in executor blocking mode.
Available radio types: zmq.
Cell pci=1, bw=10 MHz, 1T1R, dl_arfcn=368500 (n3), dl_freq=1842.5 MHz, dl_ssb_arfcn=368410, ul_freq=1747.5 MHz

N2: Connection to AMF on 10.53.1.2:38412 completed
E2AP: Connection to Near-RT-RIC on 10.0.2.10:36421 completed
E2AP: Connection to Near-RT-RIC on 10.0.2.10:36421 completed
E2AP: Connection to Near-RT-RIC on 10.0.2.10:36421 completed
==== gNB started ===
Type <h> to view help
4. Start the User Equipment (UE)
First, create the required network namespace:
sudo ip netns add ue1
Then start the UE:
cd srsRAN_test_environment/srsRAN_4G/build/srsue/src
sudo ./srsue srsRAN_test_environment/oran-sc-ric/e2-agents/srsRAN/ue_zmq.conf
The output should indicate that the UE has successfully established a session with the 5G Core:
Active RF plugins: libsrsran_rf_zmq.so
Inactive RF plugins:
Reading configuration file ../../../../oran-sc-ric/e2-agents/srsRAN/ue_zmq.conf...

Built in Release mode using commit ec29b0c1f on branch HEAD.

Opening 1 channels in RF device=zmq with args=tx_port=tcp://127.0.0.1:2001,rx_port=tcp://127.0.0.1:2000,base_srate=11.52e6
Supported RF device list: zmq file
CHx base_srate=11.52e6
Current sample rate is 1.92 MHz with a base rate of 11.52 MHz (x6 decimation)
CH0 rx_port=tcp://127.0.0.1:2000
CH0 tx_port=tcp://127.0.0.1:2001
Current sample rate is 11.52 MHz with a base rate of 11.52 MHz (x1 decimation)
Current sample rate is 11.52 MHz with a base rate of 11.52 MHz (x1 decimation)
Waiting PHY to initialize ... done!
Attaching UE...
Random Access Transmission: prach_occasion=0, preamble_index=0, ra-rnti=0x39, tti=174
Random Access Complete.     c-rnti=0x4601, ta=0
RRC Connected
PDU Session Establishment successful. IP: 10.45.1.2
RRC NR reconfiguration successful.
5. Start an xApp
Launch a simple xApp:
docker compose exec python_xapp_runner ./simple_xapp.py
In the Near-RT RIC terminal, you should see an indication that the xApp has started, for example:
ric_rtmgr_sim | 2025/08/26 12:31:22 POST /ric/v1/handles/xapp-subscription-handle body: {"address":"10.0.2.20","port":4560,"subscription_id":1} elapsed: 9.106µs
Meanwhile, the xApp itself monitors data traffic, as shown below:
------------------------------------------------------------------

Data Monitoring:
  E2SM_KPM RIC Indication Content:
  -ColletStartTime:  2025-08-26 12:32:34
  -Measurements Data:
  --UE_id: 0
  ---granulPeriod: 1000
  ---Metric: DRB.RlcSduTransmittedVolumeDL, Value: 0.0 [MB]

Control Logic:
 Tx Data Stats:
  UE ID: 0, Max PRB Ratio: n/a, TXed Data [MB]: 0.0
------------------------------------------------------------------
6. Generate Sample Traffic
To generate traffic, run:
sudo ip netns exec ue1 ping -s 60008 -i 0.1 10.45.1.1
You should now see the traffic in the terminal where the xApp is running.